![AIM Logo Final White RGB@2x.png]](https://3437204.hs-sites.com/hs-fs/hubfs/AIM%20Logo%20Final%20White%20RGB@2x.png?height=50&name=AIM%20Logo%20Final%20White%20RGB@2x.png)
The My Queues feature can be accessed by any user with sufficient permissions to access the Billing Reports category of the Reports Module. All that is needed is for a user to enter the criteria for their Queue, then use the Save My Queue button to save that template.
Saving Queues

The first step of saving a Queue is to configure the queue's criteria settings, such as the date range. When saving Queues, it is crucial to consider the date range that will be utilized when the Queue is executed again in the future.
- Enter a date range by hand into the date range field in order to always use that same date range.
- Utilize Date Range buttons to instead set a date range that will automatically adjust based on the current date.
- For example, in the image above, 'THIS YEAR' was selected for the date range. Users can see this was selected due to the red outline on the 'THIS YEAR' date range button.
- Once this Queue is saved by using a Date range button, its date range will consistently correspond to the current year. For instance, if the saved Queue is executed in 2024, it will operate within the date range of January 1, 2024, to December 31, 2024. Conversely, if the saved Queue is executed in 2025, it will function with a date range of January 1, 2025, to December 31, 2025.
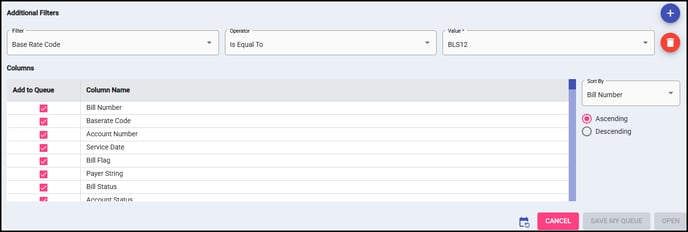
The My Queues feature allows for the configuration and saving of additional filters and columns. This encompasses all filtering settings, along with any modifications to the default columns, their arrangement, or the sorting parameters.
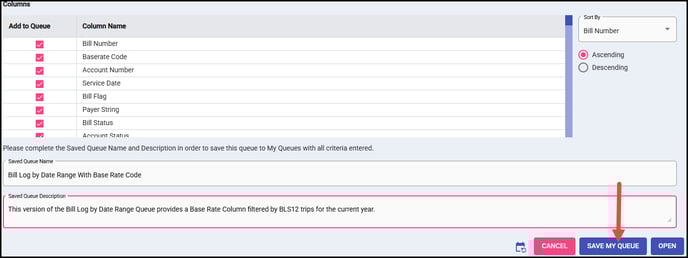
Once you have configured all the settings for the Queue, two additional fields must be completed at the very bottom of the Queue Criteria screen in order to activate the 'SAVE MY QUEUE' button.
- Saved Queue Name: Create a unique name for the saved queue with a maximum of 50 characters.
- Saved Queue Description: Here a user must enter a custom description for their queue using a maximum of 200 characters.
After filling in the Saved Queue Name and Description, as well as meeting any additional requirements for the queue, click the 'SAVE MY QUEUE' button. This will add the saved Queue to your My Queues tab in the Saved Reports/Queues Reports Category.

Accessing Saved Queues
In order to run Queues that you have saved, visit the new Saved Queues Reports Module Tab.

Inside of the My Queues category of the Saved Queues Reports Module Tab, you will find all of the queues you have saved previously.
Queues will be organized alphabetically by the type of Queue, then by Saved Queue Name.
- Queue Name will be in bold.
- Underneath you will see the Queue Description that was entered when the Queue was saved.
- On the right hand side of the screen there are three buttons for each saved Queue:
- OPEN: Runs saved queue with the criteria settings that were previously saved.
- EDIT: Use the EDIT button in order to update saved Queue criteria settings
- DELETE: This deletes the saved Queue.

Users can create new saved queue templates by editing existing ones, making changes, then using the 'SAVE AS NEW' button within the Edit Queue Criteria screen in the Saved Queues Reports Module Tab.
Users can also save updates to the width of their columns. This can be done by manually re-sizing the columns, then using the Save button that will appear afterwards in the top-right of the saved queue.

Sharing Queues
Saved queues can be shared with other users provided the user who created the saved queue has the 'Sharing' role permission. Administrators will have this access by default. To do this, select an option in the Share dropdown in the My Queues tab. 
Users can choose the option to Share to All Agencies in the Sharing dropdown of a saved queue under the My Queues tab. This will share the queue to all agencies that you have access. Any user with access to that queue can view and open that saved queue or use that template to make their own using the SAVE AS NEW button in the Edit screen.
Once a queue has been shared, users can see the original author and the original agency that report was shared from.
Some users will be able to use the Share with My Customers option as shown in the image above, but only if that user is part of an organization. This option shares the saved queue to any agency for any customer that the active user has access to within their organization. Most users will not see this option available.
Only the author of a shared queue will be able to make updates to it or change default column width settings. However, users can use the SAVE AS NEW button to create their own version of a shared queue if needed.