![AIM Logo Final White RGB@2x.png]](https://3437204.hs-sites.com/hs-fs/hubfs/AIM%20Logo%20Final%20White%20RGB@2x.png?height=50&name=AIM%20Logo%20Final%20White%20RGB@2x.png)
Reconciliation Process (Electronic Posting)
Overview
The Reconciliation feature processes specific data files from Medicare, posts transactions from 835 files, and provides functionality for reports and printing EOBs from the file data.
Availability of this module does not include the paperwork and setup necessary for the specific payer files to be received. This must be requested from the appropriate Medicare Jurisdiction or as an option if working with a Clearinghouse.
If there are questions, please work with the appropriate payer.
The Reconciliation Module requires that claims are sent and processed, and that the file is received in the proper format. For Medicare Claims and the appropriate Jurisdiction, reconciliation files are 835 files, as requested on a Medicare 8292 Form. These files are also called ERA, RECON, or Remittance.
For a Clearinghouse, work with your clearinghouse representative. An option for downloading remittance files may be available, and the Clearinghouse should be aware if The AIM System can process these files.
Keep in mind that the details provided in this guide require that the files are available. There are expectations that the processes are balanced with available reports to confirm the totals.
The Reconciliation File is processed based on the NPI Number of a company from the Agency Information Setup.
The RECON process is intended to post these transactions: Payments, Contractual Allowances, Rejections, and Interest/Late Fees.
The process posts information in the Narrative of the Bill Numbers when the transactions are applied.
Reports show information on payments, pending information, and errors received in the process. The
Error Log and a Money Log must be used to balance the RECON processes.
Downloading Reconciliation Files
Reconciliation (835) files are specific to the payer used in transmitting the claims file. Always make use of the processes specified for a payer.
Reconciliation Process
The Reconciliation or ERA file is the 835 file provided by the payer, after processing a claims file (see Transmitting to Medicare or Transmitting to a Commercial Clearinghouse).
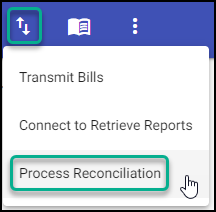
To retrieve the ERA file, go to Electronic Transmissions, Process Reconciliation, on the main menu bar.
Select a specific payer from the Payer Mailbox.
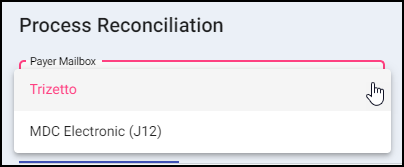
The above Payer Mailbox's is not an exclusive list. For more information on the Payment Service Mailbox, see Payment Service Integration.
From the Available Files list, select a file to process.

By default, unprocessed recon files are displayed, processing an archived file is explained later.
Note: If processing a Medicare file, the Payer Type does not need to selected.
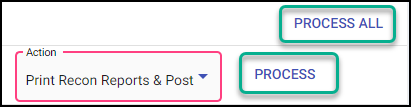
Select an option from the Action dropdown.
The typical option is Print Recon Reports & Post, which posts transactions and then shows reports, to review the processed data.

Process Reconciliation Options:
- Print Recon Reports and Post: Posts transactions and displays reports.
- Post Recon Only: Posts transactions only.
- Print Recon Reports Only: Displays reports only.
- Print Recon for Individual Bill: Display the details of a payment for a specific bill in the file.
- Archive: Moves the file to the Archived Files tab, without processing the file.
- Process with Options: Allows changes to be made before processing the file. For more details on this option, see Process Reconciliation with Options.
Once a selection is made, the Process (and Process All) option will be available.
The Process All option will allow multiple files to be completed at one time, running in a continue loop.
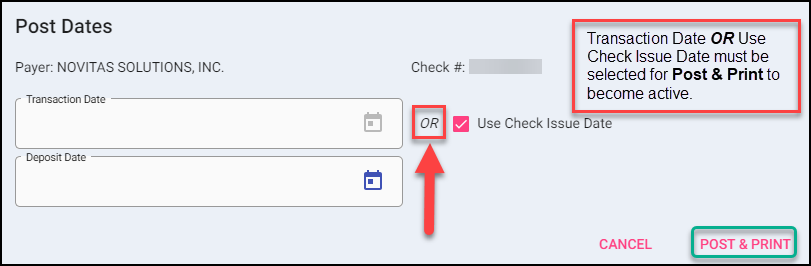
Answer the Post Date prompts. The date selected posts with each transaction of the Reconciliation File.
If using Transaction Date, enter a Date of Deposit if this needs to be added to the transactions. This is optional.
After processing, a report will be displayed with the file information.
The program acts on information in the file as provided by the payer. Data posts into the Billing Module and affects ledgers.
After the file is processed, activity can be reviewed in two areas of the Billing Module: the Narrative Tab and the Transaction Screen.
Errors when Posting
Processing of the reconciliation\remittance file depends upon the data provided by the payer. If data cannot be processed, a warning appears after a file is processed.
The warning shows that data could not be posted, and the user must review the Error Log for details.
A Warning Prompt may indicate rejections, situations where the payer takes back money on a claim, or program situations, including bad status and wrong payers or Bill Numbers.
Because of the decisions involved, normal transaction posting must be used to balance any data that did not post. The Money Log (see Logs below) and Bills on Hold Report greatly benefits users in this pursuit.
When processing a denial through the Process Reconciliation feature, the details for that denial are saved for analysis on the Rejection and Denial Analysis Report/Queue.
After processing a denial, the bill(s) can be automatically routed back to the biller who created them by enabling "Automatic Recon Denial Routing" in Billing Configuration Settings Setup.
Process Reconciliation with Options
Displays the file information and allows changes before the posting actual takes place.

This feature can be useful when multiple payers exist on one remit and codes and/or crossover payers need to be updated before posting.
If the claim was crossed over to a secondary payer, the crossover payer can be fast tracked to a printed/transmitted status using the Crossover checkbox option.
Header will include the Company Name, Payment Number(s), EOB Payment Amount, Current Payment Amount (what will be posted), EOB Contractual Amount and Current Contractual Amount (what will be posted).
Note: For Subscription Module users, patients who are currently a subscriber will be shown with their names highlighted when processing reconciliation with options.
Each payment will be displayed as its own line item, allowing changes to be made.
- Details: Allows the ability to expand and show additional details by selecting the + button. Details include a breakdown of service lines on the bill, as well as any codes returned for that specific line. Hoovering the mouse over the code, will display a description.
- Selection Checkbox Column: Billers can select bills using this checkbox to apply different transaction codes and descriptions when applicable, to all selected bills at once.

- Current Bill Payer/Rebill?: List the current payer with the Bill and Account Status. If the Rebill box is checked, a rebill transaction will automatically be completed after the posting is processed.
- Next Bill Payer/Crossover?: List the next payer on the bill with the Bill Status. Option to change or add a Next Bill Payer by selecting the drop-down.
- If the Crossover box is checked, the payer listed will automatically be Printed/Transmitted after the posting is processed.
- You may be prompted to enter the MBI/Policy Number of this payer if it cannot be pulled automatically from the patient's Account Members tab.
- Crossover Payer: List any payer the remit is showing the EOB information has been crossed over to.
- Automatic crossover payers are noted with 'AUTO CROSSOVER' in the Payers Tab of the bill along with the Account Members tab of the account after the remit has been processed.
- Active Router Action: Shows the Action(s) associated with the active routes on this bill for context.
- Payment Code/Description: Codes and descriptions that are included on the remit. These may be changed based off available options in Transaction Types Setup.
- Adjustment Code/Description: Codes and descriptions that are included on the remit. These may be changed based off available options in Transaction Types Setup.
- Other Code/Description: Codes and descriptions that are included on the remit. These may be changed based off available options in Transaction Types Setup.
- Payment Type: Populated off remit information, but can be manually changed based off available selections.
- Date: Date of EOB, but can be manually updated.
- Balance to Next Payer: Shows the calculated balance to the next payer when the 'Rebill' checkbox is selected. This is a read-only column for reference.
- Codes: List of codes from EOB. Hoovering the mouse over the code, will display a description.
- Delete?: The line may also be deleted (excluded) from the posting by marking the checkbox.
Cancel will abort the changes and not process the file.
Process will post payments/rejections with user specified changes and move the file to the Archived Files.
Import File(s)
Clearinghouse files can be imported into the Reconciliation feature.
Please contact your clearinghouse for instructions on how to download files.

After a Remittance File is downloaded, it can be imported into RECON Module:
- Select the appropriate Mailbox on the Available Files tab.
- Select Import File.
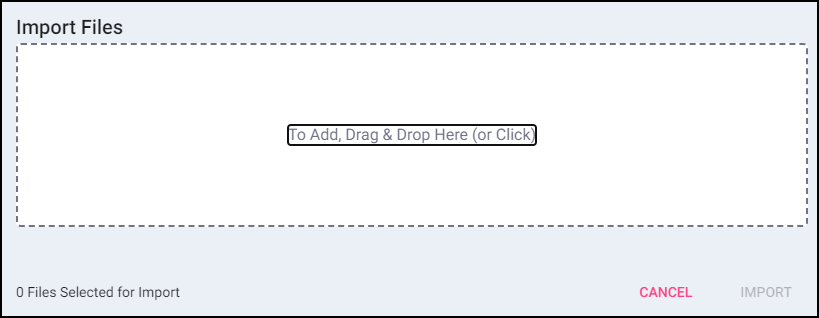
- Find the saved file(s) on your computer. Multiple files can be added at one time by highlighting all files at once.
- Import the file(s), they will now be in the Available Files list.
If importing multiple files, all files must be selected at once. Using single files will overwrite the previously attached file.
Archived Files
Once a file is processed, The AIM System saves the file. Saved files are available in the Archived Files tab. An archived file can be reprocessed, usually for report purposes.
 Processing an Archived File
The Archived Files tab provides a list of Archived Files - search for the file you're looking to process again to find it.
To find an archived file, first select the mailbox, then enter the check number or enter a payment date range to find the file easily. Alternatively, leave these properties blank and select "Search" to quickly find recently-processed files. The steps for processing the file, including Process Reconciliation Options, remain the same.
Archived files appear once the user selects "Search".
If there are any questions, errors, or concerns, contact Customer Support at 1-800-2726-4362.
Deleting an Archived File
The Delete option under Action removes the selected file from the program.
Logs
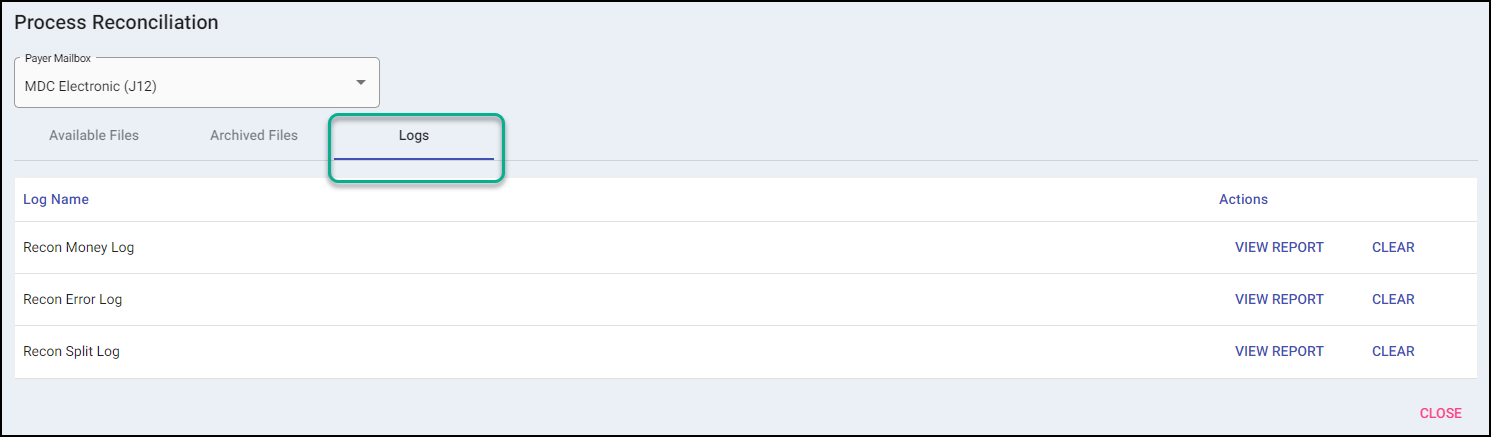
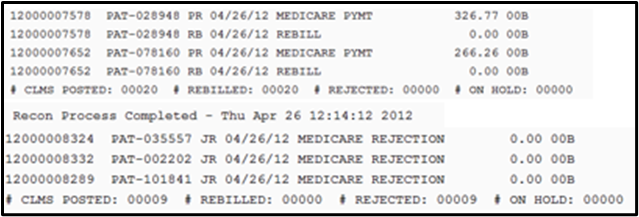
Recon Money Log
Shows details on payments applied on processed file(s).
The Reconciliation Money Log contains a date/time stamp when the processing begins, a listing of any transaction added to The AIM System, and a Date/Time stamp when the processing ends.
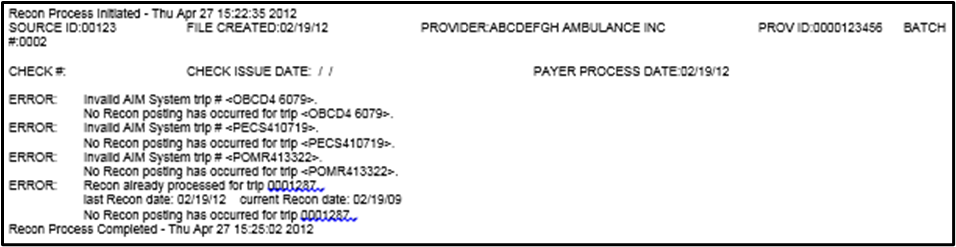
Recon Error Log
Shows details on errors found on processed file(s).
The Reconciliation Error Log contains a date/time stamp when the reconciliation process begins, a Header with the Source ID, Date Recon file created, Provider Name, Provider ID, Batch Number, Check Number, Check Issue Date (if one check for the batch), and Payer Process Date. It then lists any problems or errors encountered. It creates a date/time stamp when the reconciliation process ends.
Recon Split Log
Creates company specific-data when multiple agencies exist.
If Billing Operations involve multiple agencies, and data is transmitted from different companies to a specific electronic payer, the remittance files likely contain data for more than one agency.
The split uses the NPI, as entered in the Agency Information Setup.